4th generation "Ryuzen" style seal carving [Seal carving 2]
Here, I will briefly introduce how to carve myself (Teramachi store owner "Ryuzen") regarding seal carving using stone stamping materials.
This is just my carving method, so it is not absolute. Therefore, we would appreciate it if you could take a look at it for reference and use it as a material that you can devise yourself.

1. First, correct the stamp surface of the stone with paper, change the direction of the stamp so that it is not in only one direction, and polish it while counting the number of times. The trick is to make it the same number of times.
* For how to polish the stone itself, refer to "Stone Polishing Volume".

2. Apply red ink. The stamp surface will be easier to see. You don't have to paint it thick. In addition, we recommend that you use high-quality red ink if possible. If the calligraphy teacher is used for correction, he will lose to the black ink that will be used later and will be in trouble when he wants to correct the characters.

3. Fix it on the stamping table and make a draft with a pencil (2B). I will write the upside down characters directly. In the case of complicated characters, it is better to make a "seal" * 1 in advance and design the characters properly. We also make "stamps".
4. Overwrite the draft with black ink.
At this time, the point is to write the frame in ink as well.
5. Check in the mirror. Unexpectedly, the horizontal lines are rising to the right, the vertical lines are tilted, and my eyes are habitual. Also, the condition of my eyes seems to be different depending on the day, so be sure to reflect it in the mirror once.

6. Check and apply red ink from above to correct any bad or unpleasant parts. At this time, be careful not to apply too much on the iron like an oil painting.

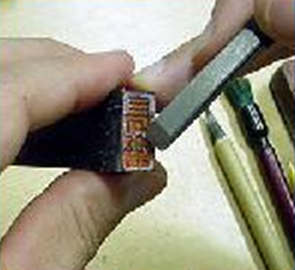
7. Carve with an iron brush. The order of carving is roughly the stroke order.

8. After carving all the way, wipe off the red ink and ink on the stamp surface with a rag.
If you leave the carving residue or ink as it is, the imprint will deteriorate, so be sure to wipe it off before pressing it.

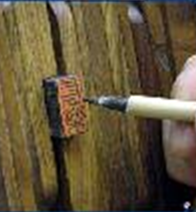
9. Apply the seal. My stamp mud is old, so I try to dig it up first with stamp material.
Then, lightly apply it many times. Don't put too much on it. Of course, it is best to knead it before putting it on.

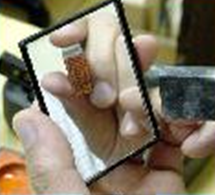
10. Press. I will try to write the character "no" all around.

11. The photo on the left is the one that has been carved. Look at the imprint you pressed and try again.

12. Please try to fix it without worrying about it. This sample is a carved word, Nagaraku, so I'm done with something like this, but if I can't get it or I'm not feeling well, I'll modify it quite a few times. It may get worse gradually, but I think it's better to fix it until you are satisfied, especially in the beginning.

13. Here is the modified version. Compared to the one before the correction, it was much cleaner. Please check the image above to see what you have corrected. However, this correction is due to personal sensibility. I think that what you are satisfied with is the best for that person. Therefore, if possible, repeat the number of corrections. I think that individuality is born from this correction work (stickiness). By all means, please try to carve your own personality through seal carving.
* 1 "Inkou"
A stamp is a blueprint (design) of a character or picture to be carved. Before writing directly on the stone, write the image you want to engrave on note paper or something in normal characters (not reverse characters).